First you have to open terminal and type this command:
sudo apt update
sudo apt upgrade
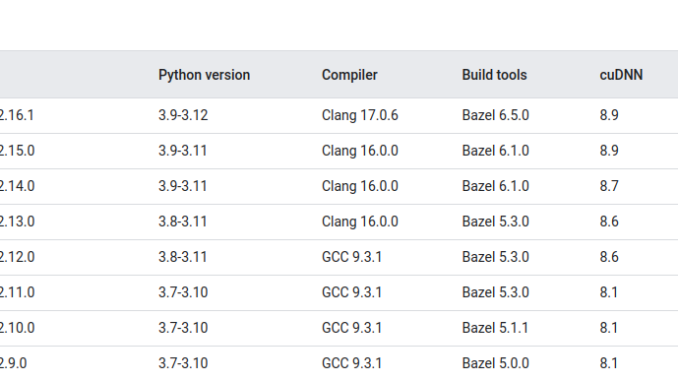
Tensorflow requirements
Now open additional driver software and see which Nvidia drivers are there like mine has 470, 545 and 535 as per latest cuda release it works on either 535 or 550. So, as I have 535 it will be compatible with cuda 12.2.
Click the link below to download of cuda 12.2.
Now as we have installed cuda 12.2. We have to install cuDNN 8.9 as mentioned in Tensorflow requirements. To install cuDNN click here and install 8.9 for 12.x version in Linux.
Click the link below to download
After downloading try this command
sudo dpkg -i (the name of file)
Now as cuda and cuDNN is installed in your computer.
Now we have to install llvm and clang as for tensorflow 15.0.0 we need version 16 of clang and llvm you can use
sudo apt install clang-16
sudo apt install llvm-16
Reboot using terminal :
sudo reboot
After that you have install the main thing that is to install Tensorflow.
Open terminal type
sudo apt update
sudo apt upgrade
After doing this now we install Tensorflow
Type below command in terminal
sudo apt install tensorflow==15.0.0
Or you can install the specific version by changing the value after ==.
Now again reboot.
And we are good to go. Tensorflow, cuda and cuDNN all are installed. You can verify it by using command in vs code.
import tensorflow as tf
tf.config.list_physical_devices(‘GPU’)
If it shows output as GPU:0 then it is installed correctly.

Be the first to comment