Introduction
Recently, there was an announcement that SAP Build Process Automation can now use custom UI5 application for approval forms.
SAP Build Process Automation – Learning Content September 2023
There is also a new tutorial that walks you through the process of creating an UI5 application in SAP Business Application Studio, deploying it to HTML5 Application repository and using it in a process.
Create an SAP UI5 Task for a Business Process
Problem Statement
When developing a UI application, you may want to test it in Business Application Studio. However, applications created using the Workflow Task UI template cannot be directly tested within Business Application Studio. This is because the application relies on specific objects (task model and inbox API) as startup parameters.
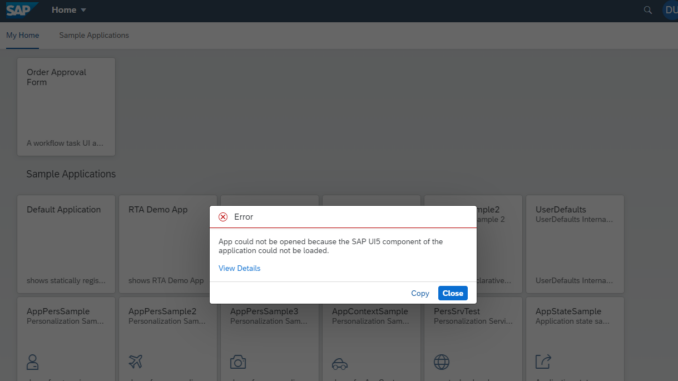
During local testing, since these parameters are not provided, the application fails right from the beginning and doesn’t even display the view. The image below is the error screen that appears when you attempt to start the app with npm start.
As a result, in order to test the task UI, you have to deploy it every time you make changes and view it within the inbox app of SAP Build Process Automation. In my opinion, this doesn’t provide an optimal developer experience.
Error screen
Solution
I have developed a simple wrapper application that instantiates the task UI as a component and embed it within the wrapper.

Setting Up
1. Task UI
Upon generation with the template, the task UI includes routing settings in manifest.json. Consequently, when you run the application within Business Application Studio, it will open the newly empty Form view, even though the primary view is App.view.xml.
Structure of Task UI
To rectify this, remove the routes and targets settings from manifest.json as below. This action will not impact the application behavior within the inbox app, as routing is not used within the inbox app.
        "routing": {
            "config": {
                "routerClass": "sap.m.routing.Router",
                "viewType": "XML",
                "async": true,
                "viewPath": "namespace.myworkflowuimodule.view",
                "controlAggregation": "pages",
                "controlId": "app",
                "clearControlAggregation": false
            },
            "routes": [],
            "targets": {}
        },
2. The wrapper
Now, lets’ dive into the step-by-step process of configuring the wrapper.
2.1. Clone the Repository
2.2. Install Dependency
- Execute the following command to install dependencies.
npm install
2.2. Enable App-to-App navigation
In order for the wrapper to access the task UI application, we need fiori-tools-servestatic settings in ui5.yaml. To achieve this, you can utilize “Enable App-To-App navigation” command of Fiori tools.
- Enable App-to-App navigation with the following command.

- Select taskui-wrapper as the source.

- Select your task UI project.

2.3. Configure ui5.yaml
- The settings blow are generated when you enable App-to-App navigation. Replace the dot(.) in the path with a slash (/).
 Under the customMiddleware fiori-tools-proxy, add the following block.
        backend:
        - path: /resources/ordersmgtnsp/workflowuimodule/bpmworkflowruntime
          pathPrefix: /public/workflow/rest
          url: https://spa-api-gateway-bpi-us-prod.cfapps.us10.hana.ondemand.com
          destination: workflowruntime
Please ensure that the destination
workflowruntimehas been created in the BTP subaccount (the name of the destination does not matter). For details on how to register the destination, please refere to my previous blog post. Also, replace/ordersmgtnsp/workflowuimodulewith the<namespace>/<id>of your application.- In the end, your ui5.yaml will look like the example below:
specVersion: "3.1"
metadata:
  name: taskuiwrapper
type: application
server:
  customMiddleware:
    - name: fiori-tools-proxy
      afterMiddleware: compression
      configuration:
        ignoreCertError: false
        ui5:
          path:
            - /resources
            - /test-resources
          url: https://ui5.sap.com
        backend:
          - path: /resources/ordersmgtnsp/workflowuimodule/bpmworkflowruntime
            pathPrefix: /public/workflow/rest
            url: https://spa-api-gateway-bpi-us-prod.cfapps.us10.hana.ondemand.com
            destination: workflowruntime
    - name: fiori-tools-appreload
      afterMiddleware: compression
      configuration:
        port: 35729
        path: webapp
        delay: 300
    - name: fiori-tools-preview
      afterMiddleware: fiori-tools-appreload
      configuration:
        component: taskuiwrapper
        ui5Theme: sap_horizon
    - name: fiori-tools-servestatic
      afterMiddleware: compression
      configuration:
        paths:
          - path: /resources/ordersmgtnsp/workflowuimodule
            src: ../ordersmanagement/workflow-ui-module/webapp
          - path: /appconfig
            src: appconfig
2.4. Configure component usage in manifest.json
- In manifest.json, locate the following section under
sap.ui5."components": { "ordersmgtnsp.workflowuimodule": { "lazy": true } } }, "componentUsages": { "taskUI": { "name": "ordersmgtnsp.workflowuimodule", "settings": {} } - Replace
ordersmgtnsp.workflowuimodulewith the<namespace>.<id>of your application.
Running the Wrapper
What does the Wrapper do?
The controller of the wrapper is responsible for the following tasks:
- It implements a mock inboxAPI, which positions buttons at the footer based on the parameters received from the task UI.
- It instantiates the task UI component, supplying it with the necessary startup parameters, and embeds the component within its view.
Please note that the wrapper does not perform task instance updates as the inbox app does. However, if desired, you can execute the event handler (actionEventHandler) passed by the task UI which sends a request to update the task instance.
sap.ui.define([
    "sap/ui/core/mvc/Controller",
    "sap/ui/model/json/JSONModel",
    "sap/m/Button",
    "sap/m/MessageToast",
    "sap/m/ToolbarSpacer"
],
    /**
     * @param {typeof sap.ui.core.mvc.Controller} Controller
     */
    function (Controller, JSONModel, Button, MessageToast, ToolbarSpacer) {
        "use strict";

        return Controller.extend("taskuiwrapper.controller.View1", {
            onInit: function () {

            },

            onShowTaskUI: function () {
                const taskModel = new JSONModel({
                    InstanceID: this.byId("taskInstanceId").getValue()
                })

                //clear buttons
                this.byId("toolbar").removeAllContent();
                this.byId("toolbar").addContent(new ToolbarSpacer());

                const that = this;
                const inboxAPI = {
                    updateTask: function () {
                    },
                    addAction: function (action, actionEventHandler, listener) {
                        // make the first letter of type uppercase
                        const type = action.type.charAt(0).toUpperCase() + action.type.slice(1);
                        const button = new Button({
                            text: action.label,
                            type: type,
                            press: function () {
                                MessageToast.show(`Action ${action.label} triggered`)
                            }
                        })
                        that.byId("toolbar").addContent(button);
                    }
                };

                this.byId("page").setBusy(true);
                this.getOwnerComponent().createComponent({
                    usage: 'taskUI',
                    componentData: {
                        startupParameters: {
                            taskModel: taskModel,
                            inboxAPI: inboxAPI
                        }
                    }
                }).then((component)=> {
                    this.byId("attachmentComponentContainer").setComponent(component);
                    this.byId("page").setBusy(false);
                });

            }
        });
    });
Closing
I hope this wrapper app will make your task UI development experience better. Should you have any questions or require further assistance, please feel free to reach out. Thanks for reading!


Be the first to comment