Dear all,
This blog outlines the approach to implement modern-style custom pop-ups and error messages on the UI screen within the Advance Workflow product interface, similar to web or mobile applications for enhancing the user experience.
Kindly follow the steps provided below for implementation:
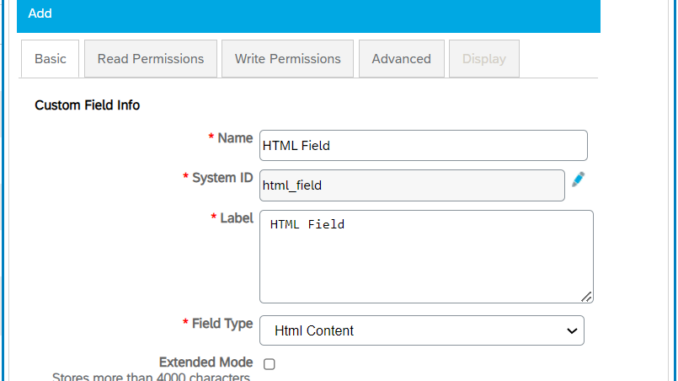
1) Create an HTML Content field from the Custom fields section, deploy it in your form and make Display as Only Value in the from designer.
Setup → FIELDS & FORMS → Custom Fields
2) Write a Groovy script as shown below for your button on-click event/on change of any custom field with the validation to perform.
Setup → DEVELOPMENT → Scripts
Code:
try
  {
     // Your block of code //
	// Throw the error message you want to pop up on the screen in the validation block //
	throw new Exception('Showing pop-up on screen.')
    // Your rest of code //
  }
catch(Exception e)
{
  String msg=e
  if(msg.equalsIgnoreCase('java.lang.Exception: Showing pop-up on screen.'))
  {
     String popUpMessage = "Showing pop-up on screen."
     String errorBody = GetPopup(popUpMessage)
     form.setValue('html_field',errorBody)
  }
  // Extend else conditions for other validations
}

def GetPopup(String popUpMessage)
{
  String popUp = """<!DOCTYPE html>
<html>
<head>
<style>
/* Styles for the popup container */
.popup-container {
    display: none; /* Hide the popup by default */
    position: fixed;
    top: 0;
    left: 0;
    width: 100%;
    height: 100%;
    background: rgba(0, 0, 0, 0.7); /* Semi-transparent background overlay */
    z-index: 9999; /* Ensure it's above other content */
    display: flex;
    justify-content: center;
    align-items: center;
}

/* Styles for the popup content */
.popup-content {
    background: linear-gradient(to bottom, #FBFCFC,#FDEDEC);
    padding: 20px;
    border-radius: 10px;
    box-shadow: 0px 0px 20px rgba(0, 0, 0, 0.7);
    text-align: center;
    opacity: 0; /* Start with 0 opacity */
    transform: translateY(-20px); /* Slide in from the top */
    transition: opacity 0.5s ease, transform 0.5s ease;
    width: 300px; /* Adjust the width as needed */
}
/* Styling for the popup */
.popup-title {
    font-size: 24px;
    color: #333;
    margin-bottom: 10px;
}

.popup-message {
    font-size: 16px;
    color: #555;
    margin-bottom: 20px;
}

.close-button {
    background: #3498db;
    color: #fff;
    padding: 7px 14px;
    border-radius: 7px;
    font-weight: bold;
    text-transform: uppercase;
    cursor: pointer;
    transition: background 0.3s ease;
}

.close-button:hover {
    background: #2980b9;
}
</style>
</head>
<body>

<div class="popup-container">
    <!-- Popup content -->
    <div class="popup-content">
<img src="https://cdn-icons-png.flaticon.com/128/7068/7068033.png" alt="Error" width="70px" height="70px">
        <p class="popup-message">$popUpMessage</p>
        <span class="close-button" onclick="hidePopup()">OK</span>
    </div>
</div>

<script>
// JavaScript functions to show and hide the popup
function showPopup() {
    const popup = document.querySelector('.popup-container');
    const popupContent = document.querySelector('.popup-content');
    popup.style.display = 'flex';
    setTimeout(() => {
        popupContent.style.opacity = '1';
        popupContent.style.transform = 'translateY(0)';
    }, 100);
}

function hidePopup() {
    const popup = document.querySelector('.popup-container');
    const popupContent = document.querySelector('.popup-content');
    popupContent.style.opacity = '0';
    popupContent.style.transform = 'translateY(-20px)';
    setTimeout(() => {
        popup.style.display = 'none';
    }, 500);
}

// Automatically show the popup when the script is loaded/triggered
showPopup();
</script>
</body>
</html>
"""
  return popUp;
}For instance, considering the code provided above, the resulting pop-up would appear as shown in the below snippet for example:

Thank you for taking the time to read this post. Hope you find that helpful.


Be the first to comment