Paginated Reports in Report Builder:
Hello all, I am here again with something really interesting to share with you all. You all must have used the Power BI platform to create different visualization for your data. But, how many of you are stuck while creating a single pager report? When you have to display your output of data in a single pager PDF form or simply an A4 size. Yes, you can do it with Power BI but a specialized tool for pixel-perfect paginated reports that fits well on a page is Report Builder. This could be done more simply by using Report Builder.
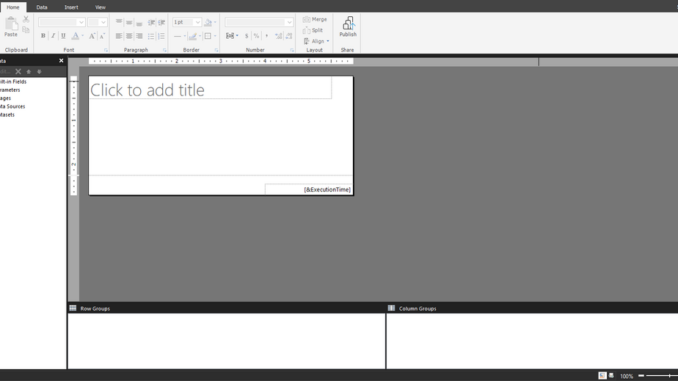
Power BI Report Builder is a tool for building paginated reports that you can publish to the Power BI service. This is how it looks like:
Similar to different tools this report builder’s layout has many different options.

You can easily view different options in the above picture. Let’s quickly move on to the description of Paginated Reports.
While you are working on a Paginated Report it means that you are gathering your data to work on it and giving it a simple display look – that is easy to understand and must be eye-catching.
The best use of Paginated reports is that you can easily view it as a Print layout view in order to see how your reports will look like in a print format. In this blog, we are going to talk about specifically a Designing Report Layout.
So, choose the option of Report Builder from your screen and click to open it.

After that from the wizard window, I am going to choose Table or Matrix Wizard.
As far as you click on it, it will show you the window to choose a Dataset. If you are using it for the first time there you have to choose the connection for your Dataset.
In the dropdown menu, you can see many options:
- Azure Analysis Service
- Azure Synapse Analytics
- Dataverse
- Enter Data
- Microsoft Azure SQL Database
- Microsoft SQL server
- Microsoft SQL Server Analysis Server
- ODBC
- Oracle Database
- Power BI Dataset
- TERADATA
Amongst them, you can choose the right option from where you need to get your data.
After setting up the database now we build up the connection properties.
Just go ahead and test your connection.
In the next step, we have to define a Dataset that will use that data source that was initially connected.
The next screen that appeared is about Graphical designing where you set all the properties and attributes which you want to add to your report. It’s pretty simple to use as you just have to put your desired values in the right columns and rows. And that is it. After completion of this process, you just can simply view your report how it looks. Just have a look at the following sample.
It is a simple report made for a Company Sales Performance:
As you can see data is entered in different rows and columns, an image of a logo is added in the upper left corner, heading and subheading are also present that gives a complete look to our report.
Next, I am going to show you its Print Layout format.
See how simple it is. You can view your Report’s final version on your screen and if you want to change anything you can simply do it before you take a Print or Publish to Power BI service.
Publishing your report is really very simple. Just click on the File > Publish > Sign in with your Power BI credentials and that’s it.
You can easily take a printout also with just a simple click on Print as you can see in the above image.
I hope you find it interesting and simple to use. So how many of you are now going to use it to design your Paginated reports?
Thank you


Be the first to comment