
Image classification is one of the most important applications of deep learning and Artificial Intelligence. Image classification refers to assigning labels to images based on certain characteristics or features present in them. The algorithm identifies these features and uses them to differentiate between different images and assign labels to them. In this tutorial titled ‘The ultimate guide to building powerful Keras Image Classification Models’, you will learn how to perform image classification with Keras, a deep learning library.
What Is Image Classification?
Image classification is the process of assigning classes to images. This is done by finding similar features in images belonging to different classes and using them to identify and label images.
Image classification is done with the help of neural networks. Neural networks are deep learning algorithms. The below picture shows a neural network.
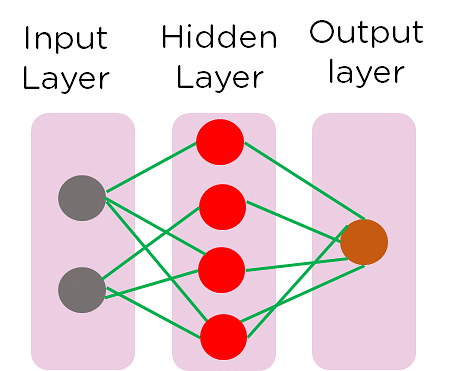
Figure 1: Neural Network
Neural Networks contain multiple layers of neurons that perform prediction, classification, etc. The output of each neuron is fed to the neurons in the next layer which helps fine-tune the output until we reach the final output layer. The different layers which are present in a neural network are :
- Input Layer: This is the layer through which we give the input to your neural network
- Hidden Layer: This layer contains various neurons which process the input received from the input layer
- Output Layer: The final layer in the network which processes your data one last time and gives you the output
Neural networks can be easily implemented using a deep learning library like Keras, Tensorflow, or Pytorch. You will be using Keras to implement your Neural Networks. Keras is a Python library that supports other deep learning libraries as backends while providing a user-friendly frontend. It offers strong computational power while maintaining ease of implementation.
Your AI/ML Career is Just Around The Corner!
AI Engineer Master’s ProgramExplore Program
Intel Image Classification Dataset
The dataset that you will be using is the Intel Image Classification dataset which contains images of different landforms such as forests, glaciers, mountains, sea, buildings, and streets. It is a well-collected dataset with images meticulously collected and stored in different folders.
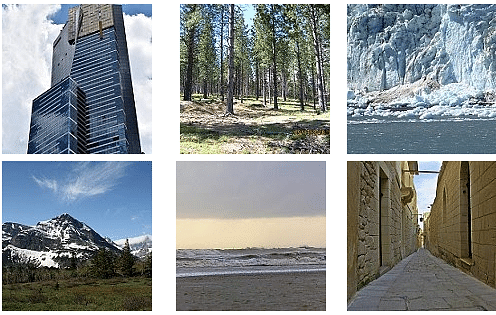
Figure 2: Intel Image Classification Dataset
Loading the Data
You will begin by loading your data and importing the necessary modules.
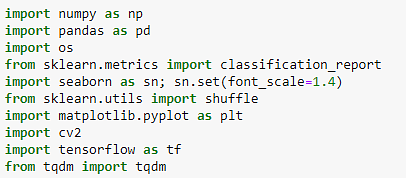
Figure 3: Importing modules
You will also declare variables that contain the class names and the corresponding label and define the desired IMAGE_SIZE for our pictures. You must define the labels corresponding to the various classes in the dataset.
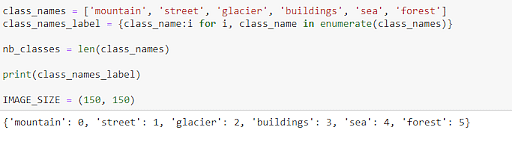
Figure 4: Defining class labels
Now, load our data. You will define a function called load_data which you can use to load your train and test data.
- You have two folders within the data folder, the seg_train folder, and seg_test folder.
- Within each of these folders, you also have a folder containing images from each class.
- You will read individual images from each folder and push them into your image array after converting them to RPG form and resizing.
- You will append a label to this image and append it to the output array.
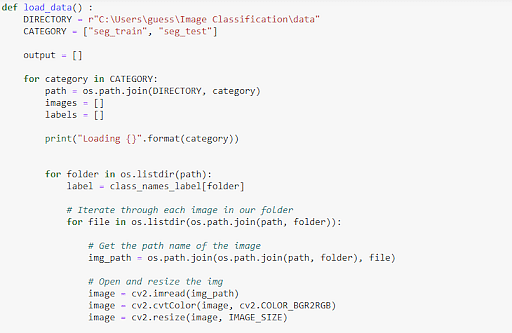
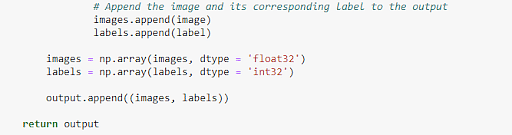
Figure 5: Loading our data
You will then call your load_data() function and save your training and testing data. To better train the model, you will shuffle the data in your train dataset.

Figure 6: Creating your training and testing dataset
Your AI/ML Career is Just Around The Corner!
AI Engineer Master’s ProgramExplore Program
How to Create a Convolution Neural Network?
Creating a Convolution Neural Network with Keras is relatively easy. You can define which model you want. In this case, you will be using a sequential model. You then define the different layers.
- You are using one hidden layer for our model.
- You must define your input layer as a convolution layer followed by a MaxPooling layer.
- You have a hidden layer of another convolution layer and a hidden layer.
- You flatten your outputs to reduce the number of features and you have an output layer consisting of a dense relu layer and a dense softmax layer.
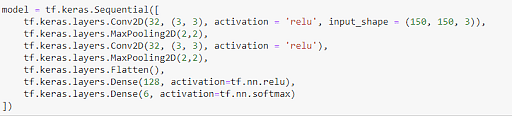
Figure 7: Creating a CNN
Following this, you have to compile our model. You need to use an Adam optimizer to optimize your model and a loss function to calculate the loss. The metrics define which metric you want to calculate. In this case, it is accuracy.
![]()
Figure 8: Compiling the model
After compiling, fit the model to your training data, ie: train the model. You will train it in batch sizes of 128 with 6 epochs and use 20% of the data as the validation set.
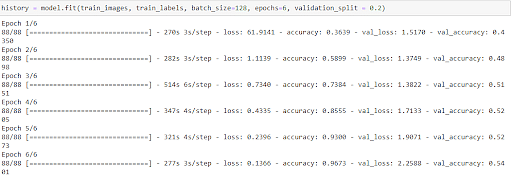
Figure 9 : Training our model
Your AI/ML Career is Just Around The Corner!
AI Engineer Master’s ProgramExplore Program
Plotting Accuracy
To plot the accuracy of the model, define a function plot_accuracy_loss(). The data returned after your neural network also includes the final accuracy and loss of the model. You plot the accuracy of the training set and validation set for each epoch to understand the variation in your accuracy. Along with this, you also plot the loss and validation loss.
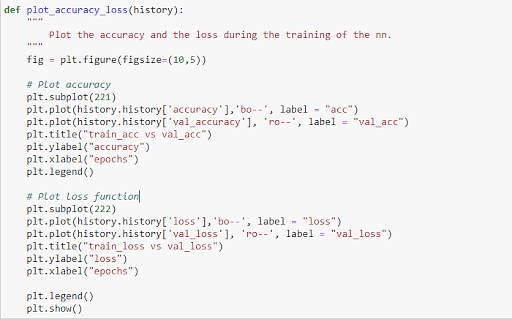
Figure 10: Plotting accuracy of the model
Now call your plot function with the results of your training.
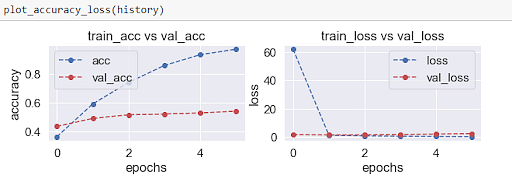
Figure 11: Accuracy of your model
Now, evaluate the loss and accuracy of your model on the test data. From the graphs, you can see that the accuracy of the model increases with every epoch for both training and testing sets. The loss of the model decreases with every epoch as your model learns and gets better.
Along with this, you must also save the model predictions and use them to make a classification report of different metrics such as precision, recall, etc to get a clear view of how well the model is performing.
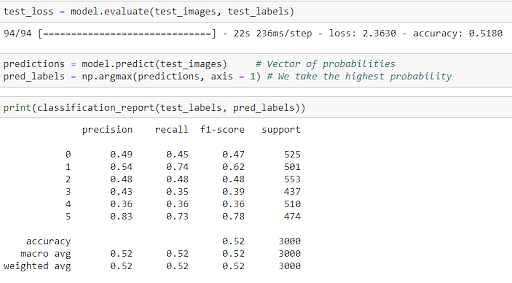
Figure 12: Creating a classification report
How to Create a VGG16 Model?
VGG16 is a pre-trained CNN model which is used for image classification. It is trained on a large and varied dataset and fine-tuned to fit image classification datasets with ease.
Now, import a VGG16 model. You must initialize the model and add input and output layers.
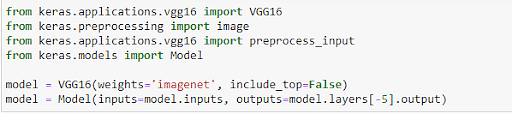
Figure 13: Importing VGG16
You must now extract the features from the dataset and save them as train and test features.
![]()
Figure 14: Feature Extraction
Now, create the final model by specifying the inputs and outputs. You use convolution and MaxPooling layers as input layers and then flatten and use Dense layers for the output.
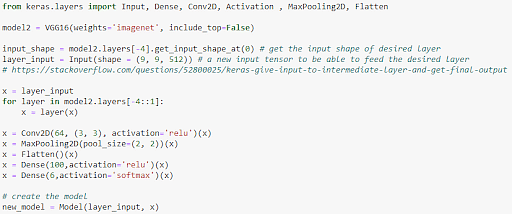
Figure 15: Creating the model
Your AI/ML Career is Just Around The Corner!
AI Engineer Master’s ProgramExplore Program
You then need to compile your model using the adam optimizer and use the accuracy metric.
![]()
Figure 16: Compiling our model
You then train the model on your test data.
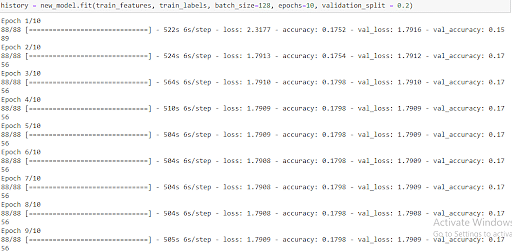
Figure 17: Training the VGG16 Model
You can plot the model error by calling the plot_accuracy_loss() function.
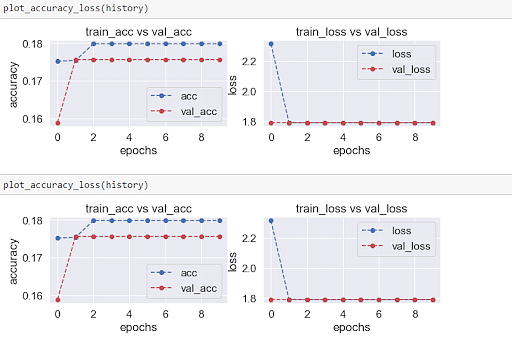
Figure 18: Plotting accuracy of VGG16
Conclusion
In this tutorial titled ‘The ultimate guide to building powerful Keras Image Classification Models’, you explored image classification and understood the basic principle behind neural networks. You then looked into your dataset and the Intel Image Classification Dataset. Moving on, you learned how to load data for the program and implement image classification using Keras with CNN. You calculated and plotted the accuracy of your model and finally took a look at the VGG16 architecture.
If you wish to learn more about Image Classification and Deep Learning check out our Caltech Artificial Intelligence Course by Simplilearn in Collaboration with Caltech University and IBM. You will learn many crucial topics like NLP, Keras, Tensorflow, and much more. You can also become an AI Engineer with our Artificial Intelligence Engineer.
Hope this tutorial taught you the basics of image classification and how to perform it using Keras. Do you have any doubts or questions for us? Mention them in this tutorial’s comments section, and we’ll have our experts answer them for you at the earliest!
Be the first to comment